NXP MCXW71/K32W1 OTA guide#
Convert srec into sb3 file#
The OTA image files must be encrypted using Over The Air Programming Tool
(OTAP).
Bootloader will load the new OTA image only if it detects that the file was
encrypted with the OTAP correct keys.
.srec file is input for Over The air Programming (OTAP) application
(unencrypted) and it’s converted to .sb3 format (encrypted).
In OTAP application
select OTA protocol =>
OTAPMatterBrowse File
follow default options (KW45/K32W148, Preserve NVM)
image information: will update “Application Core (MCU)” - this will generate the image only for the CM33 core
keep other settings at default values
Generate ota file#
In order to build an OTA image, use the NXP wrapper over the standard tool
src/app/ota_image_tool.py:
scripts/tools/nxp/ota/ota_image_tool.py
The tool can be used to generate an OTA image with the following format:
| OTA image header | TLV1 | TLV2 | ... | TLVn |
where each TLV is in the form |tag|length|value|.
Note that “standard” TLV format is used. Matter TLV format is only used for factory data TLV value.
Please see more in the OTA image tool guide.
Here is an example that generates an OTA image with application update TLV from
an .sb3 file:
./scripts/tools/nxp/ota/ota_image_tool.py create -v 0xDEAD -p 0xBEEF -vn 2 -vs "2.0" -da sha256 --app-input-file ~/binaries/chip-mcxw71-app.sb3 ~/binaries/chip-mcxw71-app.ota
A note regarding OTA image header version (-vn option). An application binary
has its own software version (given by
CHIP_DEVICE_CONFIG_DEVICE_SOFTWARE_VERSION, which can be overwritten). In
order to have a correct OTA process, the OTA header version should be the same
as the binary embedded software version. A user can set a custom software
version in the gn build args by setting nxp_software_version to the wanted
version.
OTA factory data#
A user can update the factory data through OTA, at the same time the application
firmware is updated by enabling the following processor in the gn args:
chip_enable_ota_factory_data_processor=1to enable default factory data update processor (disabled by default).
The OTA image used must be updated to include the new factory data.
Running OTA#
The OTA topology used for OTA testing is illustrated in the figure below. Topology is similar with the one used for Matter Test Events.
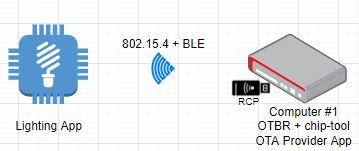
The concept for OTA is the next one:
there is an OTA Provider Application that holds the OTA image. In our case, this is a Linux application running on an Ubuntu based-system;
the OTA Requestor functionality is embedded inside the reference application. It will be used for requesting OTA blocks from the OTA Provider;
the controller (a linux application called chip-tool) will be used for commissioning both the device and the OTA Provider App. The device will be commissioned using the standard Matter flow (BLE + IEEE 802.15.4) while the OTA Provider Application will be commissioned using the
onnetworkoption ofchip-tool;during commissioning, each device is assigned a node id by the chip-tool (can be specified manually by the user). Using the node id of the device and of the reference application, chip-tool triggers the OTA transfer by invoking the
announce-ota-providercommand - basically, the OTA Requestor is informed of the node id of the OTA Provider Application.
Computer #1 can be any system running an Ubuntu distribution. We recommand using CSA official instructions from here, where RPi 4 are proposed. Also, CSA official instructions document point to the OS/Docker images that should be used on the RPis. For compatibility reasons, we recommand compiling chip-tool and OTA Provider applications with the same commit id that was used for compiling the reference application. Also, please note that there is a single controller (chip-tool) running on Computer #1 which is used for commissioning both the device and the OTA Provider Application. If needed, these instructions could be used for connecting the RPis to WiFi.
Build the Linux OTA provider application:
user@computer1:~/connectedhomeip$ : ./scripts/examples/gn_build_example.sh examples/ota-provider-app/linux out/ota-provider-app chip_config_network_layer_ble=false
Build Linux chip-tool:
user@computer1:~/connectedhomeip$ : ./scripts/examples/gn_build_example.sh examples/chip-tool out/chip-tool-app
Start the OTA Provider Application:
user@computer1:~/connectedhomeip$ : rm -rf /tmp/chip_*
user@computer1:~/connectedhomeip$ : ./out/ota-provider-app/chip-ota-provider-app -f chip-mcxw71-app.ota
Provision the OTA provider application and assign node id 1. Also, grant ACL entries to allow OTA requestors:
user@computer1:~/connectedhomeip$ : rm -rf /tmp/chip_*
user@computer1:~/connectedhomeip$ : ./out/chip-tool-app/chip-tool pairing onnetwork 1 20202021
user@computer1:~/connectedhomeip$ : ./out/chip-tool-app/chip-tool accesscontrol write acl '[{"fabricIndex": 1, "privilege": 5, "authMode": 2, "subjects": [112233], "targets": null}, {"fabricIndex": 1, "privilege": 3, "authMode": 2, "subjects": null, "targets": null}]' 1 0
Provision the device and assign node id 2:
user@computer1:~/connectedhomeip$ : ./out/chip-tool-app/chip-tool pairing ble-thread 2 hex:<operationalDataset> 20202021 3840
Start the OTA process:
user@computer1:~/connectedhomeip$ : ./out/chip-tool-app/chip-tool otasoftwareupdaterequestor announce-ota-provider 1 0 0 0 2 0
Known issues#
SRP cache on the openthread border router needs to flushed each time a new commissioning process is attempted. For this, factory reset the device, then execute
ot-ctl server disablefollowed byot-ctl server enable. After this step, the commissioning process of the device can start;Due to some MDNS issues, the commissioning of the OTA Provider Application may fail. Please make sure that the SRP cache is disabled (
ot-ctl srp server disable) on the openthread border router while commissioning the OTA Provider Application;No other Docker image should be running (e.g.: Docker image needed by Test Harness) except the OTBR one. A docker image can be killed using the command:
user@computer1:~/connectedhomeip$ : sudo docker kill $container_id
In order to avoid MDNS issues, only one interface should be active at one time. E.g.: if WiFi is used then disable the Ethernet interface and also disable multicast on that interface:
user@computer1:~/connectedhomeip$ sudo ip link set dev eth0 down
user@computer1:~/connectedhomeip$ sudo ifconfig eth0 -multicast
If OTBR Docker image is used, then the “-B” parameter should point to the interface used for the backbone.
If Wi-Fi is used on a RPI4, then a 5Ghz network should be selected. Otherwise, issues related to BLE-WiFi combo may appear.